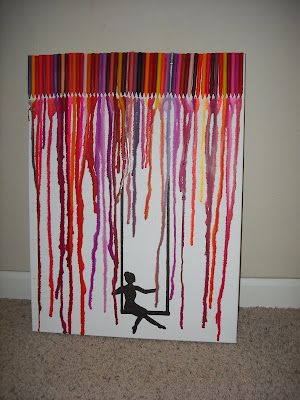
The steps are pretty simple and I like to refer to it as "dummy art" because it's pretty hard to mess up. To practice, we bought cheaper, small canvases from Michael's (I had everyone involved to try different techniques). We hot glued various sizes and colors of crayons - both with and without the labels - to the tops of the canvases. Then, we used a hair dryer and different attachments to heat up and melt the crayons so that the wax would run down the canvas.
Things I learned from practicing:
1. A hair dryer works fine, but tends to shoot the melted wax all over the canvas and you can't direct it very well.
2. I prefer crayons with the labels removed.
3. Smaller crayon pieces work better for smaller canvases.
4. Crayola works best.
5. Large globs of crayon that have been melted will snap off of the canvas.
Practice results:

For the real deal, I waited for the 50 percent off sale at Michael's and went back and purchased some higher quality canvas in several different sizes. I also bought about 400 crayons (sounds like a lot, but it's only around 3 large boxes and I had a lot of canvas to cover). I mixed in regular crayons with metallic and glitter versions when I found out they existed. They are hard to find, even on the internet, but Wal-Mart has everything.
After telling my grandparents about the project one day, my grandpa suggested I use a heat gun instead of a hair dryer and I might get closer to the desired results that I was describing. As far as I know, a heat gun is a man tool and it came from my grandpa's shop, so I don't know what it is actually supposed to be used for. Melting things, I guess. Essentially, it gets a lot warmer than a hair dryer and has a setting where it will blow air out very slowly allowing for more control over the location and length of the dripping wax. I have a feeling that this heat gun saved my project.
After some creative brainstorming with my brother, I decided that I also wanted to eventually draw silhouettes among the colors and we came up with what they would be, where they would go, and exactly what color patterns I would use. We spent about two hours cutting the labels off of the crayons - SO MANY CRAYONS - and hot glued them into place. The smaller canvases got smaller portions of crayon.
Moving into the garage, I used the heat gun to melt the crayons and tilted each canvas to speed up or slow down the wax lines. If there were any large globs of crayon at the end of the drip, I laid the canvas down flat and set the heat gun on the drip to distribute the wax better. I don't know if this is necessary, but I let the canvases set for over a day before returning to them. I measured the areas I would be working with and drew the silhouettes that I wanted on thicker card stock paper and cut them out. Then I traced the picture onto the canvas with a pencil and filled it all in with a sharpie. This was the hardest part only because you can't erase on canvas so I was nervous about messing up.
Results!
Umbrella:

Swing:

Spider:

Owls:

Shark:


